OS X: Disable Bluetooth Keyboard/Mouse Auto assistant

In some cases you may wish to disable the Bluetooth Assistant that pops up when a machine has no keyboard or mouse connected. It is rather simple. You can do it either via System Preferences > Bluetooth > Advanced and un-tick "Open Bluetooth Setup Assistant at startup when no keyboard is detected" and the associated one for the pointing device.

Alternatively, this can be controlled via the command line.

Turn bluetooth off: 

defaults write /Library/Preferences/com.apple.Bluetooth.plist ControllerPowerState 0

Disable Assistant for Keyboard

defaults write /Library/Preferences/com.apple.Bluetooth.plist BluetoothAutoSeekKeyboard 0

Disable Assistant for Mouse/Trackpad

defaults write /Library/Preferences/com.apple.Bluetooth.plist BluetoothAutoSeekPointingDevice 0

OS X Server (Mavericks): Xcode Part 1

Introducing a brand new service aimed at developers, OS X Server’s Xcode Service is all about providing, what Apple refers to as continuous integration.

Automated building, analyzing, testing, archiving and hosting your repositories are all part of the new Xcode Service.

Additionally there is an entire web interface providing access to all the test bots with their results, archives and the latest builds of your app. A nice touch is the Big Screen mode, allowing you to have a big status display in the office via Airplay and Apple-TV if you wanted to.

In Part 1, we will dig in and see how we go about setting it up. Part 2 will cover a bit more about the use of Web Interface for the service.

First steps

Fire up the Mac App store and grab OS X Server and Xcode. Once your downloads are done, launch OS X Server and go through the setup assistant. Upon completion, select Xcode in the sidebar.

‘Choose Xcode...’ and navigate to /Applications and select Xcode. This will trigger the Xcode setup. During this Xcode will launch and you might need to follow a prompt or two if you haven’t launched Xcode prior to selecting it in OS X Server.

Next you’ll see the main Settings display for the Xcode Service.

Getting in to the thick of it

Start by adding your Developer Teams, simply click on the Add.. button. You'll be prompted to sign in with your developer ID. It's important to note that you should sign in with a developer ID that has Admin or Agent rights on the Developer portal if you using an ID that is part of a registered developer company.   

If you're an iOS developer you would want to add a device. Simply plug in the device. It will show under the devices area. Click on Use for Development. If the device has a passcode, unlock and click 'Trust' else it will not show under Devices. 

Reaching this point, you have a configured Xcode service. From here you are able to further customise by adjusting permissions for who can view/create Bots. Time to flip the On switch!

Repositories

Part of the Xcode service is the ability to host your code repository. While it requires no further configuration and will function right out of the box. There are a couple of pitfalls worth noting.

Repository access is set to allow HTTP, HTTPS. Should you wish to make use of SSH, be sure to check under your Server's settings who is allowed to use SSH! Here's why...

The default value is set to only allow SSH for 'administrators'. The trouble is when the repository has SSH enabled, Xcode on your developer workstation will prefer SSH over HTTP and HTTPS.  If the account that you fill in on the workstation when connecting to the server is not an administrator, it will appear as if you are using an invalid password. Be sure to set administrators to all users if you plan to use SSH.

The second pitfall that you might run into, relate to permissions of a newly created repository when SSH is enabled. Default permissions dictate that 'Logged in users' can create repositories. With SSH enabled however, you need to be aware that when Xcode attempts to check out a repository, it will likely default to SSH, which has separate permissions to the defaults. Double clicking the repository in question will reveal that only the original creator can read/write via SSH. Another member attempting to check out this repository will see an error in Xcode stating that its not a valid Git repository!

In order to rectify this, click the edit button and tick the area marked in green, which allows view access for logged in users via SSH.

OS X Server (Mavericks): Manage Users & Groups

New to Server’s abilities in OS X Mavericks are templates and keywords. They are not new per se, however they are new to the Server app. In previous versions of OS X Server they resided in Workgroup Manager, a tool that has now officially been deprecated, or so most of us thought until this appeared: http://support.apple.com/kb/DL1698

To explore Server app’s new features, lets create a simple scenario:

A school offers three courses. Students must be part of a particular group in order to gain access to their relevant course content. Staff have similar file sharing requirements, but they also need access to certain services. Lastly we have a few lecturers who teach on a part-time basis.

Create a new user:

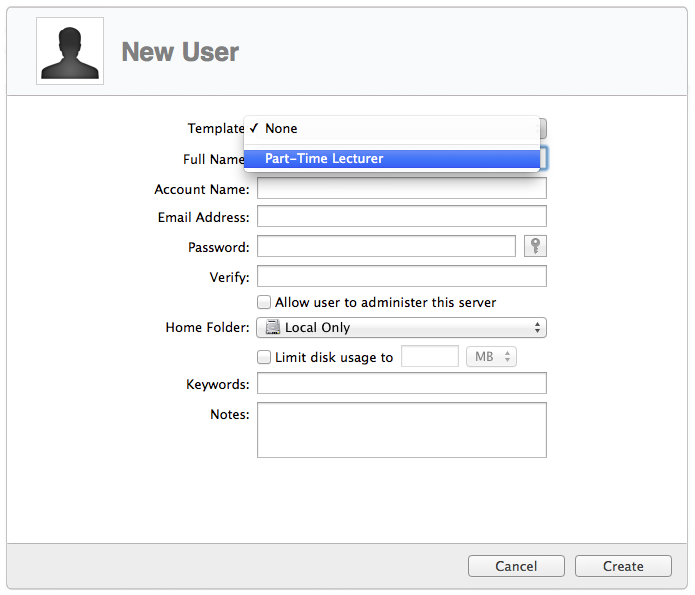
Located in Server’s sidebar, select Users under the Accounts section. Proceed by clicking the + button. The fields are self-explanatory in the New User window and can simply be populated with the required information. At the bottom of the window we encounter the first of two new features. 

Keywords and Notes.

New User Dialog

Their primary function is to help us better distinguish between a large amount of users. This is achieved by means of filtering with keywords or notes. Now it becomes much easier to adjust a setting for a targeted set of users. Consider our scenario: We have students, staff and lecturers. Already we have three potential keywords. 

In the screenshot, we created a user called Jason Bourne and set a keyword ‘lecturer’. In addition to this keyword, we also added ‘part-time’. 

Now we are able to filter on the keyword ‘lecturer’ and see which of our users are lecturers and by adding ‘part-time’ we can further reduce the results to only show part-time lecturers. An additional example: Students attending different courses and tagging the students with a course-code keyword. Thus allowing you to filter based on the course.

The Notes field operate in the same way as keywords. It is however more suited to more detailed information as per the larger field.

Through these examples, it is quite clear how keywords and notes can help us manage a large set of users more efficiently.

Next: Templates

Yet again an old feature from Workgroup Manager that has now made it into Server app. Being a rather handy function, its return is a welcome one.

Templates can be configured for both Users and Groups and offers a simple way to pre-configure User and Group creation.

Accessing Templates is easy, simply click the cogwheel in either Users or Groups in Server app and select ‘Edit Templates’.

Template creation couldn’t be simpler, just fill in all the fields as in our example and click done. Really nothing else to it!

After creating your first template, on subsequent user or group creation you will notice a new drop down menu at the top. Click the drop down, select your template and simply proceed to fill in the user’s details. The rest is all taken care of by the template.

Lastly, we can inspect the user by editing it. This will reveal the full extent of what the template applied when we created the new user.